11.4. elk入门
ELK由ElasticSearch、Logstash和Kiabana三个开源工具组成。官方网站:https://www.elastic.co/products ,Logstash非常重量级,且效率很低 ,吃内存厉害,Beats是一个轻量化版本的logStatsh。
Elasticsearch是基于 JSON 的分布式搜索和分析引擎,专为实现水平扩展、高可用和管理便捷性而设计。
Logstash 是动态数据收集管道,拥有可扩展的插件生态系统,能够与 Elasticsearch 产生强大的协同作用。
Kibana Kibana 能够以图表的形式呈现数据,并且具有可扩展的用户界面,供您全方位配置和管理 Elastic Stack。
Beats 是轻量型采集器的平台,从边缘机器向 Logstash 和 Elasticsearch 发送数据。
组件:
索引组件: Lucene
搜索组件: Solr,ElasticSearch
关于Lucene的核心术语:
索引(index)相对于数据库中的数据库
类型(type)相当于数据库中的表
文档(document)相当于数据库中的行
11.4.1. 准备工作
hosts文件解析配置
[root@centos-151 ~]# vim /etc/hosts
[root@centos-151 ~]# cat /etc/hosts
127.0.0.1   localhost localhost.localdomain localhost4 localhost4.localdomain4
::1         localhost localhost.localdomain localhost6 localhost6.localdomain6

192.168.46.151 centos-151.linuxpanda.tech centos-151 c151
192.168.46.152 centos-152.linuxpanda.tech centos-152 c152
192.168.46.153 centos-153.linuxpanda.tech centos-153 c153
192.168.46.154 centos-154.linuxpanda.tech centos-154 c154

[root@centos-151 ~]# scp /etc/hosts c152:/etc/
[root@centos-151 ~]# scp /etc/hosts c153:/etc/
[root@centos-151 ~]# scp /etc/hosts c154:/etc/
关闭防火墙和selinux
安装jdk环境
[root@centos-151 ~]# yum install java-1.8.0-openjdk-devel
[root@centos-152 ~]# yum install java-1.8.0-openjdk-devel
[root@centos-153 ~]# yum install java-1.8.0-openjdk-devel
[root@centos-154 ~]# yum install java-1.8.0-openjdk-devel
11.4.2. 安装elk
官方下载的实在是太慢了。 好在清华大学镜像站点提供了镜像,美滋滋。
[root@centos-151 ~]# yum-config-manager --add-repo=https://mirrors.tuna.tsinghua.edu.cn/elasticstack/5.x/yum/
[root@centos-152 ~]# yum-config-manager --add-repo=https://mirrors.tuna.tsinghua.edu.cn/elasticstack/5.x/yum/
[root@centos-153 ~]# yum-config-manager --add-repo=https://mirrors.tuna.tsinghua.edu.cn/elasticstack/5.x/yum/
[root@centos-154 ~]# yum-config-manager --add-repo=https://mirrors.tuna.tsinghua.edu.cn/elasticstack/5.x/yum/

[root@centos-151 ~]# yum install elasticsearch
11.4.3. 修改配置文件
[root@centos-151 ~]# cd /etc/elasticsearch/
[root@centos-151 elasticsearch]# ls
elasticsearch.yml  jvm.options  log4j2.properties  scripts
[root@centos-151 elasticsearch]# vim elasticsearch.yml
# 编辑如下行
cluster.name: my-application
node.name: c151
node.attr.rack: r1
path.data: /elk/data
path.logs: /elk/logs
network.host: 192.168.46.151
discovery.zen.ping.unicast.hosts: ["c151", "c152", "c153"]
discovery.zen.minimum_master_nodes: 2

[root@centos-151 elasticsearch]# vim jvm.options
# 修改如下2行
-Xms1g
-Xmx1g
[root@centos-151 elasticsearch]# scp elasticsearch.yml  jvm.options  c153:/etc/elasticsearch/
[root@centos-151 elasticsearch]# mkdir /elk/{data,logs} -pv
[root@centos-151 elasticsearch]# chown elasticsearch.elasticsearch /elk -R
[root@centos-151 elasticsearch]# scp -r -p /elk c152:/
[root@centos-151 elasticsearch]# scp -r -p /elk c153:/
[root@centos-152 ~]# vim /etc/elasticsearch/elasticsearch.yml
node.name: c152
network.host: 192.168.46.152
[root@centos-153 ~]# vim /etc/elasticsearch/elasticsearch.yml
node.name: c153
network.host: 192.168.46.13

# 启动服务
[root@centos-151 elasticsearch]# systemctl daemon-reload && systemctl start elasticsearch
[root@centos-152 elasticsearch]# systemctl daemon-reload && systemctl start elasticsearch
[root@centos-153 elasticsearch]# systemctl daemon-reload && systemctl start elasticsearch
[root@centos-151 elasticsearch]# ss -tunl |grep 9.00
tcp    LISTEN     0      128       ::ffff:192.168.46.151:9200                 :::*
tcp    LISTEN     0      128       ::ffff:192.168.46.151:9300                 :::*
11.4.4. 测试elasticsearch
[root@centos-151 ~]# curl http://c151:9200/
{
"name" : "c151",
"cluster_name" : "my-application",
"cluster_uuid" : "2pSvD0vGTHaxZny1EFvmFQ",
"version" : {
    "number" : "5.6.8",
    "build_hash" : "688ecce",
    "build_date" : "2018-02-16T16:46:30.010Z",
    "build_snapshot" : false,
    "lucene_version" : "6.6.1"
},
"tagline" : "You Know, for Search"
}
[root@centos-151 ~]# curl http://c152:9200/
{
"name" : "c152",
"cluster_name" : "my-application",
"cluster_uuid" : "2pSvD0vGTHaxZny1EFvmFQ",
"version" : {
    "number" : "5.6.8",
    "build_hash" : "688ecce",
    "build_date" : "2018-02-16T16:46:30.010Z",
    "build_snapshot" : false,
    "lucene_version" : "6.6.1"
},
"tagline" : "You Know, for Search"
}
[root@centos-151 ~]# curl http://c153:9200/
{
"name" : "c153",
"cluster_name" : "my-application",
"cluster_uuid" : "2pSvD0vGTHaxZny1EFvmFQ",
"version" : {
    "number" : "5.6.8",
    "build_hash" : "688ecce",
    "build_date" : "2018-02-16T16:46:30.010Z",
    "build_snapshot" : false,
    "lucene_version" : "6.6.1"
},
"tagline" : "You Know, for Search"
}

# 集群健康
[root@centos-151 ~]# curl http://c151:9200/_cluster/health?pretty
# 集群健康
[root@centos-151 ~]# curl http://c151:9200/_cluster/health | python -m json.tool
# 集群统计信息
[root@centos-151 ~]# curl http://c151:9200/_cluster/stats?pretty
# 查看节点信息
[root@centos-151 ~]# curl http://c151:9200/_cat/nodes
# 查看健康信息
[root@centos-151 ~]# curl http://c151:9200/_cat/health
11.4.5. 插入数据
curl -XPUT 'http://c151:9200/book/it/1' -d '{"name": "zhaojiedi", "publisher": "zhao"}'
curl -XPUT 'http://c151:9200/book/it/2' -d '{"name": "xiaojia", "publisher": "zhao"}'
curl -XPUT 'http://c151:9200/book/it/3' -d '{"name": "zhao", "publisher": "zhaojiedi"}'
11.4.6. 查询数据
[root@centos-151 ~]# curl  'http://c151:9200/_search?q=zhao&pretty=true'
{
"took" : 7,
"timed_out" : false,
"_shards" : {
    "total" : 5,
    "successful" : 5,
    "skipped" : 0,
    "failed" : 0
},
"hits" : {
    "total" : 3,
    "max_score" : 0.25811607,
    "hits" : [
    {
        "_index" : "book",
        "_type" : "it",
        "_id" : "2",
        "_score" : 0.25811607,
        "_source" : {
        "name" : "xiaojia",
        "publisher" : "zhao"
        }
    },
    {
        "_index" : "book",
        "_type" : "it",
        "_id" : "1",
        "_score" : 0.25811607,
        "_source" : {
        "name" : "zhaojiedi",
        "publisher" : "zhao"
        }
    },
    {
        "_index" : "book",
        "_type" : "it",
        "_id" : "3",
        "_score" : 0.25811607,
        "_source" : {
        "name" : "zhao",
        "publisher" : "zhaojiedi"
        }
    }
    ]
}
}
手工去写这个查询语句是很麻烦的,官方提供了web查询方式的。
11.4.7. elasticsearch-head插件安装
[root@centos-151 ~]# vim /etc/elasticsearch/elasticsearch.yml
# 添加如下2行
http.cors.enabled: true
http.cors.allow-origin: "*"

[root@centos-151 ~]# yum install git npm

[root@centos-151 elasticsearch]# cd /usr/local/
[root@centos-151 local]# ls
bin  etc  games  include  lib  lib64  libexec  sbin  share  src
[root@centos-151 local]# git clone https://github.com/mobz/elasticsearch-head
[root@centos-151 local]# ls
bin  elasticsearch-head  etc  games  include  lib  lib64  libexec  sbin  share  src
[root@centos-151 local]# cd elasticsearch-head/
[root@centos-151 phantomjs]# yum install lbzip2 bzip2
[root@centos-151 elasticsearch-head]# npm install -g cnpm --registry=https://registry.npm.taobao.org
[root@centos-151 elasticsearch-head]# cnpm install
[root@centos-151 elasticsearch-head]# npm run start
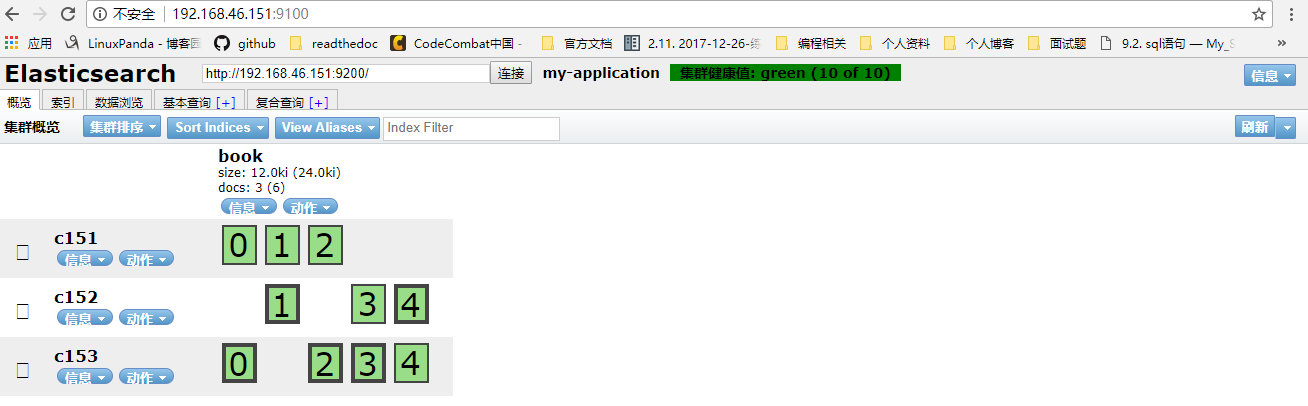
11.4.8. elasticsearch-head插件配置测试
浏览器输入 http://192.168.46.151:9100/

11.4.9. logstash配置
[root@centos-154 ~]# yum install logstash
[root@centos-154 ~]# rpm -ql logstash |wc -l
11293
[root@centos-154 ~]# rpm -ql logstash |grep logstash$
/usr/share/logstash/bin/logstash
/var/lib/logstash
/var/log/logstash
11.4.9.1. 配置从标准输入到标准输出
[root@centos-154 conf.d]# cd /etc/logstash/conf.d/
[root@centos-154 conf.d]# vim sample.conf
[root@centos-154 conf.d]# cat sample.conf
input {
    stdin {}
}

output {
    stdout {
        codec => rubydebug
    }
}

# 测试下
[root@centos-154 conf.d]# /usr/share/logstash/bin/logstash -f ./sample.conf  -t
# 运行
[root@centos-154 conf.d]# /usr/share/logstash/bin/logstash -f ./sample.conf
OpenJDK 64-Bit Server VM warning: If the number of processors is expected to increase from one, then you should configure the number of parallel GC threads appropriately using -XX:ParallelGCThreads=N
WARNING: Could not find logstash.yml which is typically located in $LS_HOME/config or /etc/logstash. You can specify the path using --path.settings. Continuing using the defaults
Could not find log4j2 configuration at path /usr/share/logstash/config/log4j2.properties. Using default config which logs errors to the console
The stdin plugin is now waiting for input:
# 输入样例
hello world
{
    "@version" => "1",
        "host" => "centos-154.linuxpanda.tech",
    "@timestamp" => 2018-04-03T13:25:49.970Z,
    "message" => "hello world"
}
zhaojiedi
{
    "@version" => "1",
        "host" => "centos-154.linuxpanda.tech",
    "@timestamp" => 2018-04-03T13:25:52.776Z,
    "message" => "zhaojiedi "
}
11.4.9.2. 配置从文件输入到标准输出
[root@centos-154 conf.d]# yum install httpd
[root@centos-154 conf.d]# systemctl start httpd
[root@centos-154 conf.d]# curl 192.168.46.154
sorry page
[root@centos-154 conf.d]# cat /var/log/httpd/access_log
192.168.46.154 - - [03/Apr/2018:21:29:00 +0800] "GET / HTTP/1.1" 200 11 "-" "curl/7.29.0"
[root@centos-154 conf.d]# vim sample.conf
[root@centos-154 conf.d]# cat sample.conf
input {
    file {
        path => ["/var/log/httpd/access_log"]
        start_position => "beginning"
    }
}

output {
    stdout {
        codec => rubydebug
    }
}

[root@centos-154 conf.d]# /usr/share/logstash/bin/logstash -f ./sample.conf
OpenJDK 64-Bit Server VM warning: If the number of processors is expected to increase from one, then you should configure the number of parallel GC threads appropriately using -XX:ParallelGCThreads=N
WARNING: Could not find logstash.yml which is typically located in $LS_HOME/config or /etc/logstash. You can specify the path using --path.settings. Continuing using the defaults
Could not find log4j2 configuration at path /usr/share/logstash/config/log4j2.properties. Using default config which logs errors to the console
{
    "@version" => "1",
        "host" => "centos-154.linuxpanda.tech",
        "path" => "/var/log/httpd/access_log",
    "@timestamp" => 2018-04-03T13:33:54.464Z,
    "message" => "192.168.46.154 - - [03/Apr/2018:21:29:00 +0800] \"GET / HTTP/1.1\" 200 11 \"-\" \"curl/7.29.0\""
}
这个是提取到messsage了, 但是太笼统了,我们需要让它切开为各个属性的。
11.4.9.3. filter的grok使用
[root@centos-154 conf.d]# !vim
vim sample.conf
[root@centos-154 conf.d]# cat sample.conf
input {
    file {
        path => ["/var/log/httpd/access_log"]
        start_position => "beginning"
    }
}

filter {
    grok {
        match => {

            "message" => "%{COMBINEDAPACHELOG}"
        }
    }


}

output {
    stdout {
        codec => rubydebug
    }
}

[root@centos-154 conf.d]# /usr/share/logstash/bin/logstash -f ./sample.conf
OpenJDK 64-Bit Server VM warning: If the number of processors is expected to increase from one, then you should configure the number of parallel GC threads appropriately using -XX:ParallelGCThreads=N
WARNING: Could not find logstash.yml which is typically located in $LS_HOME/config or /etc/logstash. You can specify the path using --path.settings. Continuing using the defaults
Could not find log4j2 configuration at path /usr/share/logstash/config/log4j2.properties. Using default config which logs errors to the console

# 这个时候在另一个终端执行下下面语句
[root@centos-154 ~]# echo '192.168.46.154 - - [03/Apr/2018:21:29:00 +0800] "GET / HTTP/1.1" 200 11 "-" "curl/7.29.0"' >> /var/log/httpd/access_log
# 在终端就可以看到如下输出了。
{
        "request" => "/",
        "agent" => "\"curl/7.29.0\"",
        "auth" => "-",
        "ident" => "-",
        "verb" => "GET",
        "message" => "192.168.46.154 - - [03/Apr/2018:21:29:00 +0800] \"GET / HTTP/1.1\" 200 11 \"-\" \"curl/7.29.0\"",
        "path" => "/var/log/httpd/access_log",
    "referrer" => "\"-\"",
    "@timestamp" => 2018-04-03T13:59:31.356Z,
    "response" => "200",
        "bytes" => "11",
    "clientip" => "192.168.46.154",
    "@version" => "1",
        "host" => "centos-154.linuxpanda.tech",
    "httpversion" => "1.1",
    "timestamp" => "03/Apr/2018:21:29:00 +0800"
}
11.4.9.4. filter的date使用
默认你的日期字符串是不能被识别出来是日期的, 你需要指定你的字符串是日期就需要date过滤器。
[root@centos-154 conf.d]# !vim
vim sample.conf
[root@centos-154 conf.d]# cat sample.conf
input {
    file {
        path => ["/var/log/httpd/access_log"]
        start_position => "beginning"
    }
}

filter {
    grok {
        match => {

            "message" => "%{COMBINEDAPACHELOG}"
        }
    }

    date {
        match => ["timestamp" ,"dd/MMM/YYYY:H:m:s Z"]
    }


}

output {
    stdout {
        codec => rubydebug
    }
}
11.4.9.5. geoip使用
这个很厉害的,根据ip可以获取到地理位置的,城市信息和经纬度信息。
geoip下载
[root@centos-154 conf.d]# cd /etc/logstash/
[root@centos-154 logstash]# wget http://geolite.maxmind.com/download/geoip/database/GeoLite2-City.tar.gz
[root@centos-154 logstash]# tar xf GeoLite2-City.tar.gz
[root@centos-154 logstash]# ls
conf.d  GeoLite2-City_20180327  GeoLite2-City.tar.gz  jvm.options  log4j2.properties  logstash.yml  startup.options

[root@centos-154 logstash]# ll GeoLite2-City_20180327/
total 59936
-rw-r--r-- 1 2000 2000       55 Mar 27 20:52 COPYRIGHT.txt
-rw-r--r-- 1 2000 2000 61361390 Mar 27 20:52 GeoLite2-City.mmdb
-rw-r--r-- 1 2000 2000      433 Mar 27 20:52 LICENSE.txt
-rw-r--r-- 1 2000 2000      116 Mar 27 20:52 README.txt

[root@centos-154 logstash]# mv GeoLite2-City_20180327/ maxmind

[root@centos-154 logstash]# cd conf.d/
[root@centos-154 conf.d]# /usr/share/logstash/bin/logstash -f ./sample.conf

# 另一个终端
[root@centos-154 ~]# echo '223.5.5.5 - - [03/Apr/2018:21:29:00 +0800] "GET / HTTP/1.1" 200 11 "-" "curl/7.29.0"' >> /var/log/httpd/access_log

# 可以看到
{
        "request" => "/",
        "agent" => "\"curl/7.29.0\"",
        "geoip" => {
            "city_name" => "Hangzhou",
            "timezone" => "Asia/Shanghai",
                    "ip" => "223.5.5.5",
            "latitude" => 30.2936,
        "country_name" => "China",
        "country_code2" => "CN",
        "continent_code" => "AS",
        "country_code3" => "CN",
        "region_name" => "Zhejiang",
            "location" => {
            "lon" => 120.1614,
            "lat" => 30.2936
        },
        "region_code" => "ZJ",
            "longitude" => 120.1614
    },
        "auth" => "-",
        "ident" => "-",
        "verb" => "GET",
        "message" => "223.5.5.5 - - [03/Apr/2018:21:29:00 +0800] \"GET / HTTP/1.1\" 200 11 \"-\" \"curl/7.29.0\"",
        "path" => "/var/log/httpd/access_log",
    "referrer" => "\"-\"",
    "@timestamp" => 2018-04-03T13:29:00.000Z,
    "response" => "200",
        "bytes" => "11",
    "clientip" => "223.5.5.5",
    "@version" => "1",
        "host" => "centos-154.linuxpanda.tech",
    "httpversion" => "1.1",
    "timestamp" => "03/Apr/2018:21:29:00 +0800"
}
我们可以看到它识别出来223.5.5.5这个阿里云的dns为杭州的啦。
11.4.9.6. redis配合logstash
redis作为输入
input {
        redis {
                batch_count => 1
                data_type => "list"
                key => "logstash-list"
                host=> "192.168.46.154"
                port => 6379
                threads => 6
        }
}
redis作为输出
[root@centos-154 conf.d]# yum install redis
[root@centos-154 conf.d]# vim /etc/redis.conf
# 修改如下2行
requirepass redis
bind 0.0.0.0
[root@centos-154 conf.d]# systemctl restart redis
[root@centos-154 conf.d]# pwd
/etc/logstash/conf.d
[root@centos-154 conf.d]# vim redis.conf
[root@centos-154 conf.d]# cat redis.conf
input {
        file {
                path => ["/var/log/httpd/access_log"]
                start_position => "beginning"
        }
}

filter {
        grok {
                match => {

                        "message" => "%{COMBINEDAPACHELOG}"
                }
        }

        date {
                match => ["timestamp" ,"dd/MMM/YYYY:H:m:s Z"]
        }

        geoip {
                source => "clientip"
                target => "geoip"
                database => "/etc/logstash/maxmind/GeoLite2-City.mmdb"
        }

}

output {
        redis {
                host => [ "192.168.46.154" ]
                port => 6379
                db => 8
                data_type => "list"
                key => "logstash-%{+yyyy.MM.dd}"
        }
}


[root@centos-154 conf.d]# /usr/share/logstash/bin/logstash -f ./redis.conf
OpenJDK 64-Bit Server VM warning: If the number of processors is expected to increase from one, then you should configure the number of parallel GC threads appropriately using -XX:ParallelGCThreads=N

# 一个终端模拟访问
[root@centos-154 ~]# curl localhost
sorry page
# 另一个终端查看redis情况
[root@centos-154 ~]# redis-cli  -h 192.168.46.154
192.168.46.154:6379> select *
(error) ERR invalid DB index
192.168.46.154:6379> select *
(error) ERR invalid DB index
192.168.46.154:6379> select 8
OK
192.168.46.154:6379[8]> keys *
1) "logstash-2018.04.04"
192.168.46.154:6379[8]> lpop logstash-2018.04.04
"{\"request\":\"/\",\"agent\":\"\\\"curl/7.29.0\\\"\",\"geoip\":{},\"auth\":\"-\",\"ident\":\"-\",\"verb\":\"GET\",\"message\":\"::1 - - [04/Apr/2018:19:21:32 +0800] \\\"GET / HTTP/1.1\\\" 200 11 \\\"-\\\" \\\"curl/7.29.0\\\"\",\"tags\":[\"_geoip_lookup_failure\"],\"path\":\"/var/log/httpd/access_log\",\"referrer\":\"\\\"-\\\"\",\"@timestamp\":\"2018-04-04T11:21:32.000Z\",\"response\":\"200\",\"bytes\":\"11\",\"clientip\":\"::1\",\"@version\":\"1\",\"host\":\"centos-154.linuxpanda.tech\",\"httpversion\":\"1.1\",\"timestamp\":\"04/Apr/2018:19:21:32 +0800\"}"
11.4.9.7. logstash写数据到els
output {
    elasticsearch {
        hosts => ["http://192.168.46.151:9200/","http://192.168.46.152:9200/","http://192.168.46.153:9200/"]
        index => "logstash-%{+YYYY.MM.dd}"
        document_type => "apache_logs"
    }
}
11.4.10. 使用filebeat收集数据
[root@centos-154 conf.d]# yum install filebeat
[root@centos-154 filebeat]# vim filebeat.yml
# 修改如下几行内容
hosts: ["192.168.46.151:9200","192.168.46.152:9200","192.168.46.153:9200"]
paths:
    - /var/log/httpd/access_log
[root@centos-154 filebeat]# systemctl restart filebeat
# 查看
[root@centos-154 filebeat]# curl 192.168.46.151:9200/_cat/indices
green open book                jRS4oLXvQDusRzkZqTvo4Q 5 1 3 0 23.9kb 11.9kb
green open filebeat-2018.04.04 HXRGZ6sKRGaM4GDFGwf2Zg 5 1 3 0 38.6kb 19.3kb
11.4.11. kibana使用
[root@centos-154 filebeat]# vim /etc/kibana/kibana.yml
# 修改如下2行
elasticsearch.url: "http://192.168.46.151:9200"
server.host: "192.168.46.154"
[root@centos-154 filebeat]# yum install elasticsearch

在浏览器输入192.168.46.154:5601就可以访问了

.. image:: /images/elk/filebeat-1.png