4.5. ansible
4.5.1. ansible特性
模块化:调用特定的模块,完成特定任务
有Paramiko,PyYAML,Jinja2(模板语言)三个关键模块
支持自定义模块
基于Python语言实现
部署简单,基于python和SSH(默认已安装),agentless
安全,基于OpenSSH
支持playbook编排任务
幂等性:一个任务执行1遍和执行n遍效果一样,不因重复执行带来意外情况
无需代理不依赖PKI(无需ssl)
可使用任何编程语言写模块
YAML格式,编排任务,支持丰富的数据结构
较强大的多层解决方案
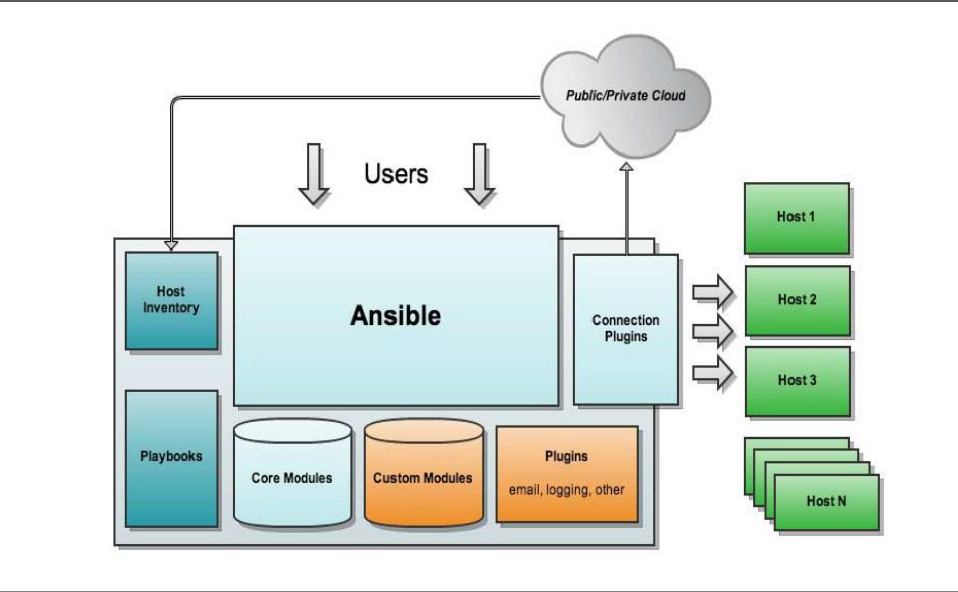
4.5.2. ansible架构
4.5.3. ansible工作原理

4.5.4. 安装软件包
[root@localhost ansible]# yum install ansible -y
[root@localhost ansible]# rpm -ql ansible
4.5.5. 添加管理主机和修改配置文件
[root@localhost ansible]# vim /etc/ansible/hosts
# 添加我们管理的主机
[db]
192.168.46.6
[web]
172.168.46.[6-7]
[root@localhost ansible]# vim /etc/ansible/ansible.cfg
# 去除以下2行的注释
host_key_checking = False
log_path = /var/log/ansible.log
hosts文件指定的db,web就是各自包含的主机统称,内置一个all变量代表所有主机。
host_key_checking 这个就是主机key检查,我们默认使用ssh连接一个主机会提示yes/no的提示,就是信任这个主机的key。
4.5.6. 使用ansible模块
查看ansible模块的个数
[root@localhost ~]# ansible-doc  -l  | wc -l
1378
获取指定模块使用帮助
[root@localhost ~]# ansible-doc ping
4.5.6.1. ping
功能: ping主机
[root@localhost ansible]# ansible all -m ping
192.168.46.6 | SUCCESS => {
    "changed": false,
    "ping": "pong"
}
172.18.46.7 | UNREACHABLE! => {
    "changed": false,
    "msg": "Failed to connect to the host via ssh: ssh: connect to host 172.18.46.7 port 22: Connection timed out\r\n",
    "unreachable": true
}
172.18.46.6 | UNREACHABLE! => {
    "changed": false,
    "msg": "Failed to connect to the host via ssh: ssh: connect to host 172.18.46.6 port 22: Connection timed out\r\n",
    "unreachable": true
}
上面我们的出错了。 是因为我们没有配置ssh免密码登陆的原因。
Note
如果不想配置主机信任,使用ansibile需要配合-k选项输入密码, 如果使用了sudo需要再配合-K选项输入sudo密码
配置ssh免密码登陆:
[root@localhost ansible]# ssh-keygen
[root@localhost ansible]# ssh-copy-id  172.18.46.6
[root@localhost ansible]# ssh-copy-id  172.18.46.7
[root@localhost ansible]# ssh-copy-id  192.168.46.6
再次执行
[root@localhost ansible]# ansible all -m ping
192.168.46.6 | SUCCESS => {
    "changed": false,
    "ping": "pong"
}
172.18.46.7 | SUCCESS => {
    "changed": false,
    "ping": "pong"
}
172.18.46.6 | SUCCESS => {
    "changed": false,
    "ping": "pong"
}
Note
这个ping模块不是走的icmp协议,走的ssh协议。
4.5.6.2. command
功能: 执行command
[root@localhost ~]# ansible-doc command
[root@localhost ~]# ansible db  -m command -a 'chdir=/root ls'
192.168.46.6 | SUCCESS | rc=0 >>
anaconda-ks.cfg
anaconda-ks.cfg.bak
install.log
install.log.syslog
Warning
在命令中使用了”<”, “>”, “|”, “;”和”&”符号的时候,需要改用shell模块的。
4.5.6.3. shell
功能: 执行远程shell命令。
[root@localhost ~]# ansible-doc shell
[root@localhost ~]# ansible web -m shell -a 'cd /root; ls -l ; touch test.txt ; ls -l;'
4.5.6.4. script
功能: 复制本地的脚本到远程,并执行,然后删除脚本
[root@localhost ~]# ansible-doc script
[root@localhost ~]# ansible db -m script -a '/root/test.sh'
192.168.46.6 | SUCCESS => {
    "changed": true,
    "rc": 0,
    "stderr": "Shared connection to 192.168.46.6 closed.\r\n",
    "stdout": "Fri Jan 12 22:47:41 CST 2018\r\nFilesystem            Size  Used Avail Use% Mounted on\r\n/dev/mapper/VolGroup-lv_root\r\n                       50G   19G   29G  40% /\r\ntmpfs                 491M     0  491M   0% /dev/shm\r\n/dev/sda1             477M   34M  418M   8% /boot\r\n/dev/mapper/VolGroup-lv_home\r\n                      146G   60M  138G   1% /home\r\n/dev/sr0              5.8G  5.8G     0 100% /mnt/cdrom\r\n",
    "stdout_lines": [
        "Fri Jan 12 22:47:41 CST 2018",
        "Filesystem            Size  Used Avail Use% Mounted on",
        "/dev/mapper/VolGroup-lv_root",
        "                       50G   19G   29G  40% /",
        "tmpfs                 491M     0  491M   0% /dev/shm",
        "/dev/sda1             477M   34M  418M   8% /boot",
        "/dev/mapper/VolGroup-lv_home",
        "                      146G   60M  138G   1% /home",
        "/dev/sr0              5.8G  5.8G     0 100% /mnt/cdrom"
    ]
}
4.5.6.5. copy
功能: 复制本地的文件到远程主机
[root@localhost ~]# ansible web -m copy -a 'src=/root/test.sh dest=/root/test.sh backup=yes owner=zhaojiedi group=root mode=0644'
172.18.46.6 | SUCCESS => {
    "changed": true,
    "checksum": "c3724e329cc83de9876f2d379065ca463e858ae6",
    "dest": "/root/test.sh",
    "gid": 0,
    "group": "root",
    "md5sum": "220f72b1a4e636373d4b9310569cf027",
    "mode": "0644",
    "owner": "zhaojiedi",
    "size": 11,
    "src": "/root/.ansible/tmp/ansible-tmp-1515809310.86-157163266332298/source",
    "state": "file",
    "uid": 500
}
172.18.46.7 | SUCCESS => {
    "changed": true,
    "checksum": "c3724e329cc83de9876f2d379065ca463e858ae6",
    "dest": "/root/test.sh",
    "gid": 0,
    "group": "root",
    "md5sum": "220f72b1a4e636373d4b9310569cf027",
    "mode": "0644",
    "owner": "zhaojiedi",
    "secontext": "system_u:object_r:admin_home_t:s0",
    "size": 11,
    "src": "/root/.ansible/tmp/ansible-tmp-1515809310.9-111150527159897/source",
    "state": "file",
    "uid": 1000
}
4.5.6.6. fetch
功能: 提取远程主机的文件到本地
[root@localhost ~]# mkdir /app
[root@localhost ~]# ansible all -m fetch -a 'src=/var/log/messages dest=/app'
192.168.46.6 | SUCCESS => {
    "changed": true,
    "checksum": "6651f324a541ddd5d3a52603353785751743610f",
    "dest": "/app/192.168.46.6/var/log/messages",
    "md5sum": "1d98b389a9644276cd5c42259af2471f",
    "remote_checksum": "6651f324a541ddd5d3a52603353785751743610f",
    "remote_md5sum": null
}
172.18.46.7 | SUCCESS => {
    "changed": true,
    "checksum": "3d69d7fe50ad1166782cd962f352782088c2eb6b",
    "dest": "/app/172.18.46.7/var/log/messages",
    "md5sum": "fa3859cc24a7ff717741ae7d043a7134",
    "remote_checksum": "3d69d7fe50ad1166782cd962f352782088c2eb6b",
    "remote_md5sum": null
}
172.18.46.6 | SUCCESS => {
    "changed": true,
    "checksum": "36ca673a1fe553d3607e1540b6d3f72ac2ebde6b",
    "dest": "/app/172.18.46.6/var/log/messages",
    "md5sum": "a60aa16df60e68a36f7c29a4c60badf8",
    "remote_checksum": "36ca673a1fe553d3607e1540b6d3f72ac2ebde6b",
    "remote_md5sum": null
}

[root@localhost ~]# tree /app
/app
├── 172.18.46.6
│   └── var
│       └── log
│           └── messages
├── 172.18.46.7
│   └── var
│       └── log
│           └── messages
└── 192.168.46.6
    └── var
可以看出来,这个功能还是相当nice的, 自动帮我们分类整理好了。
4.5.6.7. file
功能: 文件管理的
# 创建文件
[root@localhost ~]# ansible db -m file -a 'path=/root/testfile state=touch mode=644 owner=root group=root '
192.168.46.6 | SUCCESS => {
    "changed": true,
    "dest": "/root/testfile",
    "gid": 0,
    "group": "root",
    "mode": "0644",
    "owner": "root",
    "size": 0,
    "state": "file",
    "uid": 0
}
# 创建软连接
[root@localhost ~]# ansible db -m file -a 'path=/root/testfile.link state=link src=/root/testfile'
# 查看软连接
[root@localhost ~]# ansible db -a 'ls -l  /root/'
192.168.46.6 | SUCCESS | rc=0 >>
total 24
-rw-------. 1 root root 1300 Jan 10 22:10 anaconda-ks.cfg
-rw-------. 1 root root 1196 Jan 10 21:25 anaconda-ks.cfg.bak
-rw-r--r--. 1 root root 9919 Jan 10 16:57 install.log
-rw-r--r--. 1 root root 3161 Jan 10 16:56 install.log.syslog
-rw-r--r--  1 root root    0 Jan 13 00:04 testfile
lrwxrwxrwx  1 root root   14 Jan 13 00:05 testfile.link -> /root/testfile
# 删除文件
[root@localhost ~]# ansible db -m file -a 'path=/root/testfile state=absent'
192.168.46.6 | SUCCESS => {
    "changed": true,
    "path": "/root/testfile",
    "state": "absent"
}
file模块的state主要有下面几个值
directory
file
link
absent
hard
touch
4.5.6.8. hostname
功能修改hostname
[root@localhost ~]# ansible-doc hostname
[root@localhost ~]# ansible 172.18.46.6 -m hostname  -a "name=centos6.linuxpanda.tech"
hostname模块可以修改同时修改当前和文件的hostname的值。
4.5.6.9. cron
功能:计划任务管理
# 添加计划任务
[root@localhost ~]# ansible db -m cron  -a 'minute=*/5  weekday=1,3,5 job="ntpdate 172.18.0.1" name="update time" '
192.168.46.6 | SUCCESS => {
    "changed": true,
    "envs": [],
    "jobs": [
        "update time"
    ]
}
# 查看下
[root@localhost ~]# ansible db -m shell -a 'crontab -l'
192.168.46.6 | SUCCESS | rc=0 >>
#Ansible: update time
*/5 * * * 1,3,5 ntpdate 172.18.0.1

# 删除
[root@localhost ~]# ansible db -m cron -a 'job="ntpdate 172.18.0.1" name="update time" state=absent'
192.168.46.6 | SUCCESS => {
    "changed": true,
    "envs": [],
    "jobs": []
}

# 再次查看
[root@localhost ~]# ansible db -m shell -a 'crontab -l'
192.168.46.6 | SUCCESS | rc=0 >>
我们可以设置disabled属性为yes/no,来启用计划任务和关闭计划任务。
4.5.6.10. yum
# 安装包
[root@localhost ~]# ansible web -m yum -a 'name=httpd'
172.18.46.7 | SUCCESS => {
    "changed": false,
    "msg": "",
    "rc": 0,
    "results": [
        "httpd-2.4.6-67.el7.centos.6.x86_64 providing httpd is already installed"
    ]
}
172.18.46.6 | SUCCESS => {
    "changed": false,
    "msg": "",
    "rc": 0,
    "results": [
        "httpd-2.2.15-60.el6.centos.6.x86_64 providing httpd is already installed"
    ]
}

# 卸载包
[root@localhost ~]# ansible web -m yum -a 'name=httpd state=absent'

# 安装最新版本且禁用gpg检查
[root@localhost ~]# ansible web -m yum -a 'name=httpd state=latest disable_gpg_check=yes'
4.5.6.11. service
功能: 服务管理
[root@localhost ~]# ansible-doc service
[root@localhost ~]# ansible web -m service -a 'name=httpd  state=started'
service的状态比较多:
started
stop
restarted
reloaded
4.5.6.12. user
功能: 用户管理
# 创建用户
[root@localhost ~]# ansible web -m user -a 'name=test1 comment="test1" uid=1005 shell="/bin/bash" groups=root append=yes createhome=yes'
172.18.46.7 | FAILED! => {
    "changed": false,
    "msg": "usermod: UID '1005' already exists\n",
    "name": "test1",
    "rc": 4
}
172.18.46.6 | SUCCESS => {
    "changed": true,
    "comment": "test1",
    "createhome": true,
    "group": 1005,
    "groups": "root",
    "home": "/home/test1",
    "name": "test1",
    "shell": "/bin/bash",
    "state": "present",
    "system": false,
    "uid": 1005
}
# 删除用户
[root@localhost ~]# ansible web -m user -a 'name=test1 comment="test1" state=absent force=yes '
172.18.46.6 | SUCCESS => {
    "changed": true,
    "force": true,
    "name": "test1",
    "remove": false,
    "state": "absent"
}
172.18.46.7 | SUCCESS => {
    "changed": true,
    "force": true,
    "name": "test1",
    "remove": false,
    "state": "absent"
}
4.5.6.13. setup
功能: 查看主机信息
[root@localhost ansible]#  ansible all  -m setup -a 'filter="*version*"'
192.168.46.7 | SUCCESS => {
    "ansible_facts": {
        "ansible_bios_version": "6.00",
        "ansible_distribution_major_version": "7",
        "ansible_distribution_version": "7.4.1708",
        "ansible_product_version": "None",
        "ansible_python_version": "2.7.5"
    },
    "changed": false
}
172.18.46.7 | SUCCESS => {
    "ansible_facts": {
        "ansible_bios_version": "6.00",
        "ansible_distribution_major_version": "7",
        "ansible_distribution_version": "7.4.1708",
        "ansible_product_version": "None",
        "ansible_python_version": "2.7.5"
    },
    "changed": false
}
172.18.46.6 | UNREACHABLE! => {
    "changed": false,
    "msg": "Failed to connect to the host via ssh: ssh: connect to host 172.18.46.6 port 22: No route to host\r\n",
    "unreachable": true
}
192.168.46.6 | UNREACHABLE! => {
    "changed": false,
    "msg": "Failed to connect to the host via ssh: ssh: connect to host 192.168.46.6 port 22: No route to host\r\n",
    "unreachable": true
}
setup模块提供了远程主机的信息, 我们后面可以使用这个信息做分支处理的。
Note
setup模块提供的的信息都是内置变量,方便我们引用变量。
4.5.7. galaxy的使用
别人写好的剧本,你感觉不错也挺适合你的工作环境的,可以下载下来简单修改下就使用的。
我们首先在 galaxy 上下载获取一个地址
[root@localhost ~]# ansible-galaxy install geerlingguy.nginx
- downloading role 'nginx', owned by geerlingguy
- downloading role from https://github.com/geerlingguy/ansible-role-nginx/archive/2.5.0.tar.gz

- extracting geerlingguy.nginx to /root/.ansible/roles/geerlingguy.nginx
- geerlingguy.nginx (2.5.0) was installed successfully
4.5.8. playbook的基础使用
4.5.8.1. hello world
[root@localhost ~]# mkdir ansible
[root@localhost ~]# cd ansible/

# 编辑一个playbook
[root@localhost ansible]# vim helloworld.yml
[root@localhost ansible]# cat helloworld.yml
---

- hosts: all
  remote_user: root

tasks:
- name: hello world
  command: echo "hello world"

# 检查
[root@localhost ansible]# ansible-playbook helloworld.yml  -C

PLAY [all] **********************************************************************************************************************

TASK [Gathering Facts] **********************************************************************************************************
ok: [192.168.46.6]
ok: [172.18.46.6]
ok: [172.18.46.7]

TASK [hello world] **************************************************************************************************************
skipping: [192.168.46.6]
skipping: [172.18.46.6]
skipping: [172.18.46.7]

PLAY RECAP **********************************************************************************************************************
172.18.46.6                : ok=1    changed=0    unreachable=0    failed=0
172.18.46.7                : ok=1    changed=0    unreachable=0    failed=0
192.168.46.6               : ok=1    changed=0    unreachable=0    failed=0

# 执行
[root@localhost ansible]# ansible-playbook helloworld.yml

PLAY [all] **********************************************************************************************************************

TASK [Gathering Facts] **********************************************************************************************************
ok: [192.168.46.6]
ok: [172.18.46.7]
ok: [172.18.46.6]

TASK [hello world] **************************************************************************************************************
changed: [192.168.46.6]
changed: [172.18.46.6]
changed: [172.18.46.7]

PLAY RECAP **********************************************************************************************************************
172.18.46.6                : ok=2    changed=1    unreachable=0    failed=0
172.18.46.7                : ok=2    changed=1    unreachable=0    failed=0
192.168.46.6               : ok=2    changed=1    unreachable=0    failed=0
4.5.8.2. 安装服务并启动服务
[root@localhost ansible]# vim helloworld.yml
[root@localhost ansible]# cat helloworld.yml
---

- hosts: all
  remote_user: root

  tasks:
  - name: hello world
    command: echo "hello world"

[root@localhost ansible]# ansible-playbook helloworld.yml

PLAY [all] **********************************************************************************************************************

TASK [Gathering Facts] **********************************************************************************************************
ok: [192.168.46.6]
ok: [172.18.46.7]
ok: [172.18.46.6]

TASK [hello world] **************************************************************************************************************
changed: [192.168.46.6]
changed: [172.18.46.6]
changed: [172.18.46.7]

PLAY RECAP **********************************************************************************************************************
172.18.46.6                : ok=2    changed=1    unreachable=0    failed=0
172.18.46.7                : ok=2    changed=1    unreachable=0    failed=0
192.168.46.6               : ok=2    changed=1    unreachable=0    failed=0

[root@localhost ansible]# ls
helloworld.yml  httpd.yml  makehttpd.yml
[root@localhost ansible]# vim httpd.yml
[root@localhost ansible]# cat httpd.yml
---
- hosts: all
  remote_user: root

  tasks:
  - name: install httpd
    yum: name=httpd state=present
  - name: start httpd
    service: name=httpd state=started enabled=yes
[root@localhost ansible]# ansible-playbook httpd.yml

PLAY [all] **********************************************************************************************************************

TASK [Gathering Facts] **********************************************************************************************************
ok: [192.168.46.6]
ok: [172.18.46.7]
ok: [172.18.46.6]

TASK [install httpd] ************************************************************************************************************
ok: [172.18.46.6]
ok: [192.168.46.6]
ok: [172.18.46.7]

TASK [start httpd] **************************************************************************************************************
ok: [192.168.46.6]
changed: [172.18.46.6]
changed: [172.18.46.7]

PLAY RECAP **********************************************************************************************************************
172.18.46.6                : ok=3    changed=1    unreachable=0    failed=0
172.18.46.7                : ok=3    changed=1    unreachable=0    failed=0
192.168.46.6               : ok=3    changed=0    unreachable=0    failed=0
4.5.9. vault
这个主要用户管理剧本的,加密解密的。
# 加密
[root@localhost ansible]# ansible-vault encrypt httpd.yml
New Vault password:
Confirm New Vault password:
Encryption successful
# 查看
[root@localhost ansible]# cat httpd.yml
$ANSIBLE_VAULT;1.1;AES256
65613239653666353638626464363565633531663734663661376138623766346363336132336435
3866363231353338663439353730623162633630656539310a663466323539386563373631313836
65386430623637333264616564613738663766373836623536356439643938333933643737396432
3831653430396261350a353832306639383138303136336464303336663432356536336638643839
32353664303131633234623634653731386136353665373536396561366162303535363066663933
65616461313135613162613530336361613262643230323962626362353362333136636535323830
37613234386433626162373535396236623231376164636561623936333832343466653562613461
64313831303432353431396237393431383261383439353939633363323933343465623038623566
62633534363138626138376530366233656434353330343935666531313165306434663935323431
37613064393036346639656534376638643231343539323366616566653032343064383034363535
38313831386232343464313130343734343634303062613766303532623637343661653661623733
31306634656563653231353739363936363236306430663266366362323561383966393033376565
63343966376336383534643066323462373336333137653965616337353063646132323839323933
6263656164636164303231666162383066666530306161643833
# 查看
[root@localhost ansible]# ansible-vault view httpd.yml
Vault password:
---
- hosts: all
remote_user: root

tasks:
    - name: install httpd
    yum: name=httpd state=present
    - name: start httpd
    service: name=httpd state=started enabled=yes
# 解密
[root@localhost ansible]# ansible-vault decrypt httpd.yml
Vault password:
Decryption successful
# 查看
[root@localhost ansible]# cat httpd.yml
---
- hosts: all
  remote_user: root

  tasks:
  - name: install httpd
  yum: name=httpd state=present
  - name: start httpd
  service: name=httpd state=started enabled=yes
4.5.10. console
交互式执行ansible命令,不经常使用的,不过里面有写只能提示还是不错的。
使用样例:
[root@localhost ansible]# ansible-console
Vault password:
Welcome to the ansible console.
Type help or ? to list commands.

root@all (3)[f:5]$ cd db
root@db (1)[f:5]$ ping
192.168.46.6 | SUCCESS => {
    "changed": false,
    "ping": "pong"
}
root@db (1)[f:5]$ exit
4.5.11. playbook其他使用
4.5.11.1. 变量
变量定义的必须字母开头,有字母、数字和下划线组成。
方案1: 通过命令行指定 :
[root@localhost ansible]# cat var1.yml
---
- hosts: web
remote_user: root

tasks:
    - name: install package
    yum: name={{pkname}}
[root@localhost ansible]# ansible-playbook -e "pkname=htop var2=xxx" var1.yml
方案2: 直接在hosts文件中指定变量 :
# 修改/etc/ansible/hosts文件
[centos7]
172.18.46.7 pkname=htop var2=xxx var3=xxx
192.168.46.7 pkname=htop
# 或者修改为如下
[centos7]
172.18.46.7 pkname=htop
192.168.46.7 pkname=htop
[centos7:vars]
pkname=htop
var2=xxxx
方案3: 直接在yml文件中指定变量 :
[root@localhost ansible]# cat var1.yml
---
- hosts: centos7
remote_user: root
vars:
    - pkgname: htop
    var2: xxx

tasks:
    - name: install package
    yum: name={{pkname}}
方案4: 使用setup的变量 :
[root@localhost ~]# ansible all -m setup -a 'filter="*nodename*"'
[root@localhost ansible]# cat var1.yml
---
- hosts: centos7
remote_user: root
tasks:
    - name: touch a file
    file: name=/root/{{ansible_nodename}}.txt state=touch

[root@localhost ansible]# ansible all -m shell -a 'ls -l /root'
方案4: role中的的变量 :
这个后面角色的时候使用。
4.5.11.2. template
功能: 使用jinja2语言,支持变量替换功能和循环机制以适应各个主机的环境。
[root@localhost ansible]# mkdir templates/
[root@localhost ansible]# cp /etc/httpd/conf/httpd.conf  templates/httpd.conf.j2
[root@localhost ansible]# vim templates/httpd.conf.j2
# 修改如下Listen行为如下内容
Listen {{listen_port}}
[root@localhost ansible]# vim t1.yml
[root@localhost ansible]# cat t1.yml
- hosts: centos7
remote_user: root

tasks:
    - name: copy template file for httpd
      template: src=httpd.conf.j2 dest=/etc/httpd/conf/httpd.conf

[root@localhost ansible]# ansible-playbook -e "http_port=8080" t1.yml -C
[root@localhost ansible]# ansible-playbook -e "listen_port=8080" t1.ym
[root@localhost ansible]# ansible 192.168.46.7 -m shell -a 'cat /etc/httpd/conf/httpd.conf |grep -i listen'
4.5.11.3. when
功能: 功能啥时候生效。
- name: copy template file for httpd
  template: src=httpd.conf.j2 dest=/etc/httpd/conf/httpd.conf
  when: ansible_distribution_major_version=="7"
上面的那个ansible_distribution_major_version变量是从setup模块来的, 如果主版本是7上面的那个template就执行, 其他的不执行。
Note
这个就是setup模块内置的变量,可以直接使用。
4.5.11.4. with-item
功能:
[root@localhost ansible]# vim item.yml
[root@localhost ansible]# cat item.yml
---
- hosts: all
  remote_user: root

  tasks:
  - name: copy file
    file: name={{item}} state=touch
    with_items:
        - file1
        - file2
[root@localhost ansible]# ansible-playbook item.yml
4.5.11.5. 迭代变量
功能: item是一个字典。
[root@localhost ansible]# vim diedai.yml
[root@localhost ansible]# cat diedai.yml
---
- hosts: 192.168.46.158
  remote_user: root
  vars:
  - userinfo:
    - { user: "u1" , group: "g1" }
    - { user: "u1" , group: "g1" }
    - { user: "u1" , group: "g1" }

  tasks:
  - name: add group
    group: name={{ item.group }}
    with_items: "{{ userinfo }}"

  - name: add user with group
    user: name={{ item.user }} groups= {{ item.group }}
    with_items: "{{ userinfo }}"

[root@localhost ansible]# ansible-playbook diedai.yml
[root@localhost ansible]# ansible all -m shell -a 'id u1'
4.5.11.6. for
功能: 遍历指定的list
[root@localhost ansible]# pwd
/root/ansible
[root@localhost ansible]# vim for1.yml
[root@localhost ansible]# cat for1.yml
---
- hosts: centos7
  remote_user: root
  vars:
  - ports:
    - listen_port: 81
    - listen_port: 82
    - listen_port: 83
  tasks:
  - name: test for
    template: src=for1.conf.j2 dest=/app/for1.conf
[root@localhost ansible]# vim templates/
for1.conf.j2   httpd.conf.j2
[root@localhost ansible]# vim templates/for1.conf.j2
[root@localhost ansible]# cat templates/for1.conf.j2
{% for port in ports %}
server {
    listen {{port.listen_port}};
}
{% endfor   %}
4.5.11.7. if
功能: 指定条件处理
<% if vhost.servername is defined %>
<%endif%>
4.5.12. role角色
功能: 把常用的封装,提供可用性
[root@localhost ansible]# tree
.
├── nginx.retry
├── nginx.yml
└── roles
    └── nginx
        └── tasks
            ├── enable.yml
            ├── groupadd.yml
            ├── install.yml
            ├── main.yml
            ├── start.yml
            ├── stop.yml
            └── useradd.yml

3 directories, 9 files
[root@localhost ansible]# cat roles/nginx/tasks/enable.yml
- name: enable nginx
service: name=nginx state=enabled
[root@localhost ansible]# cat roles/nginx/tasks/groupadd.yml
- name: group add
group: name=nginx system=yes
[root@localhost ansible]# cat roles/nginx/tasks/install.yml
- name: install nginx
yum: name=nginx
[root@localhost ansible]# cat roles/nginx/tasks/main.yml
- import_tasks: groupadd.yml
- import_tasks: useradd.yml
- import_tasks: install.yml
- import_tasks: start.yml
- import_tasks: enable.yml
#import_tasks: stop.yml
[root@localhost ansible]# cat roles/nginx/tasks/start.yml
- name: start nginx
service: name=nginx state=started
[root@localhost ansible]# cat roles/nginx/tasks/stop.yml
- name: stop nginx
service: name=nginx state=stopped
[root@localhost ansible]# cat roles/nginx/tasks/useradd.yml
- name: user add
user: name=nginx group=nginx
简单的说, 角色把完整的yml拆分到各自的目录中, 每个目录必须有main.yml来目录下的其他文件。
上面用到了tasks目录,这是是必须的,当然还有files,templates,vars等等目录, 可以在tasks目录下的main.yml文件中引用其他的目录下yml文件。